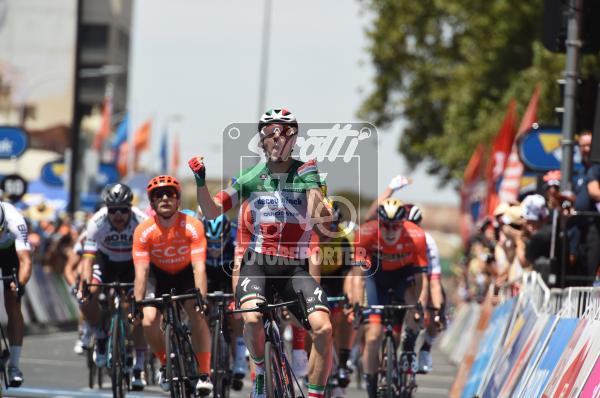
Immagine 797820 Port Adelaide Tour Down Under Picture shooted 15/01/2019 - Published 12/02/2019
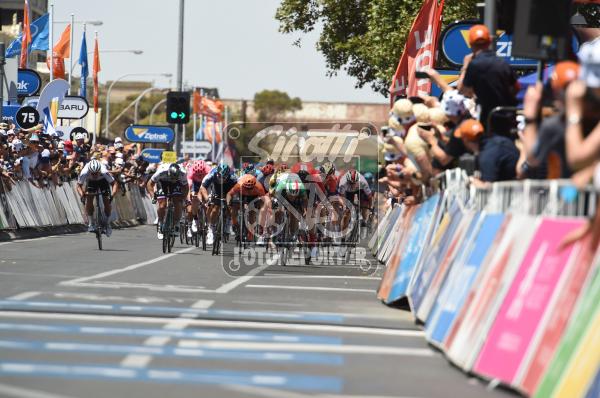
Immagine 797818 Port Adelaide Tour Down Under Picture shooted 15/01/2019 - Published 12/02/2019
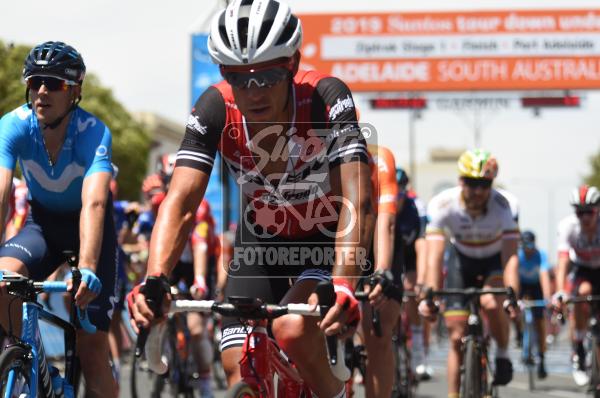
Immagine 790810 Port Adelaide Tour Down Under Picture shooted 15/01/2019 - Published 15/01/2019
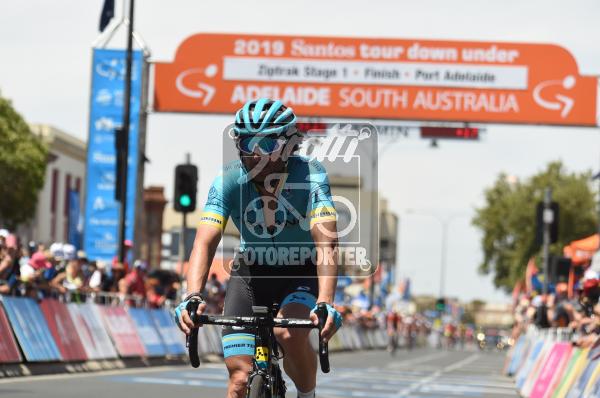
Immagine 790809 Port Adelaide Tour Down Under Picture shooted 15/01/2019 - Published 15/01/2019
Immagine 790668 Port Adelaide Tour Down Under Picture shooted 15/01/2019 - Published 15/01/2019
Immagine 790667 Port Adelaide Tour Down Under Picture shooted 15/01/2019 - Published 15/01/2019
Immagine 790666 Port Adelaide Tour Down Under Picture shooted 15/01/2019 - Published 15/01/2019
Immagine 790665 Port Adelaide Tour Down Under Picture shooted 15/01/2019 - Published 15/01/2019
Immagine 790664 Port Adelaide Tour Down Under Picture shooted 15/01/2019 - Published 15/01/2019
Immagine 790663 Port Adelaide Tour Down Under Picture shooted 15/01/2019 - Published 15/01/2019
Immagine 790662 Port Adelaide Tour Down Under Picture shooted 15/01/2019 - Published 15/01/2019
Immagine 790661 Port Adelaide Tour Down Under Picture shooted 15/01/2019 - Published 15/01/2019
Immagine 790660 Port Adelaide Tour Down Under Picture shooted 15/01/2019 - Published 15/01/2019
Immagine 790659 Port Adelaide Tour Down Under Picture shooted 15/01/2019 - Published 15/01/2019
Immagine 790658 Port Adelaide Tour Down Under Picture shooted 15/01/2019 - Published 15/01/2019
Immagine 790657 Port Adelaide Tour Down Under Picture shooted 15/01/2019 - Published 15/01/2019
Immagine 790656 Port Adelaide Tour Down Under Picture shooted 15/01/2019 - Published 15/01/2019
Immagine 790607 Port Adelaide Tour Down Under Picture shooted 15/01/2019 - Published 15/01/2019
Immagine 790606 Port Adelaide Tour Down Under Picture shooted 15/01/2019 - Published 15/01/2019
Immagine 790472 Port Adelaide Tour Down Under Picture shooted 15/01/2019 - Published 15/01/2019
Immagine 790471 Port Adelaide Tour Down Under Picture shooted 15/01/2019 - Published 15/01/2019
Immagine 790470 Port Adelaide Tour Down Under Picture shooted 15/01/2019 - Published 15/01/2019
Immagine 790469 Port Adelaide Tour Down Under Picture shooted 15/01/2019 - Published 15/01/2019
Immagine 790468 Port Adelaide Tour Down Under Picture shooted 15/01/2019 - Published 15/01/2019
Immagine 790467 Port Adelaide Tour Down Under Picture shooted 15/01/2019 - Published 15/01/2019
Immagine 790466 Port Adelaide Tour Down Under Picture shooted 15/01/2019 - Published 15/01/2019
Immagine 790465 Port Adelaide Tour Down Under Picture shooted 15/01/2019 - Published 15/01/2019
Immagine 790464 Port Adelaide Tour Down Under Picture shooted 15/01/2019 - Published 15/01/2019
Immagine 790463 Port Adelaide Tour Down Under Picture shooted 15/01/2019 - Published 15/01/2019
Immagine 790462 Port Adelaide Tour Down Under Picture shooted 15/01/2019 - Published 15/01/2019
Immagine 790461 Port Adelaide Tour Down Under Picture shooted 15/01/2019 - Published 15/01/2019
Immagine 790460 Port Adelaide Tour Down Under Picture shooted 15/01/2019 - Published 15/01/2019
Immagine 790459 Port Adelaide Tour Down Under Picture shooted 15/01/2019 - Published 15/01/2019
Immagine 790458 Port Adelaide Tour Down Under Picture shooted 15/01/2019 - Published 15/01/2019
Immagine 790456 Port Adelaide Tour Down Under Picture shooted 15/01/2019 - Published 15/01/2019
Immagine 790454 Port Adelaide Tour Down Under Picture shooted 15/01/2019 - Published 15/01/2019
Immagine 790453 Port Adelaide Tour Down Under Picture shooted 15/01/2019 - Published 15/01/2019
Immagine 790452 Port Adelaide Tour Down Under Picture shooted 15/01/2019 - Published 15/01/2019
Immagine 790451 Port Adelaide Tour Down Under Picture shooted 15/01/2019 - Published 15/01/2019
Immagine 790450 Port Adelaide Tour Down Under Picture shooted 15/01/2019 - Published 15/01/2019
Immagine 790449 Port Adelaide Tour Down Under Picture shooted 15/01/2019 - Published 15/01/2019
Immagine 790447 Port Adelaide Tour Down Under Picture shooted 15/01/2019 - Published 15/01/2019
Immagine 790445 Port Adelaide Tour Down Under Picture shooted 15/01/2019 - Published 15/01/2019
Immagine 790444 Port Adelaide Tour Down Under Picture shooted 15/01/2019 - Published 15/01/2019
Immagine 790443 Port Adelaide Tour Down Under Picture shooted 15/01/2019 - Published 15/01/2019
Immagine 790441 Port Adelaide Tour Down Under Picture shooted 15/01/2019 - Published 15/01/2019
Immagine 790440 Port Adelaide Tour Down Under Picture shooted 15/01/2019 - Published 15/01/2019
Immagine 790439 Port Adelaide Tour Down Under Picture shooted 15/01/2019 - Published 15/01/2019
Immagine 790438 Port Adelaide Tour Down Under Picture shooted 15/01/2019 - Published 15/01/2019
Immagine 790437 Port Adelaide Tour Down Under Picture shooted 15/01/2019 - Published 15/01/2019
Immagine 790436 Port Adelaide Tour Down Under Picture shooted 15/01/2019 - Published 15/01/2019
Immagine 790435 Port Adelaide Tour Down Under Picture shooted 15/01/2019 - Published 15/01/2019
Immagine 790434 Port Adelaide Tour Down Under Picture shooted 15/01/2019 - Published 15/01/2019
Immagine 790433 Port Adelaide Tour Down Under Picture shooted 15/01/2019 - Published 15/01/2019
Immagine 790432 Port Adelaide Tour Down Under Picture shooted 15/01/2019 - Published 15/01/2019